
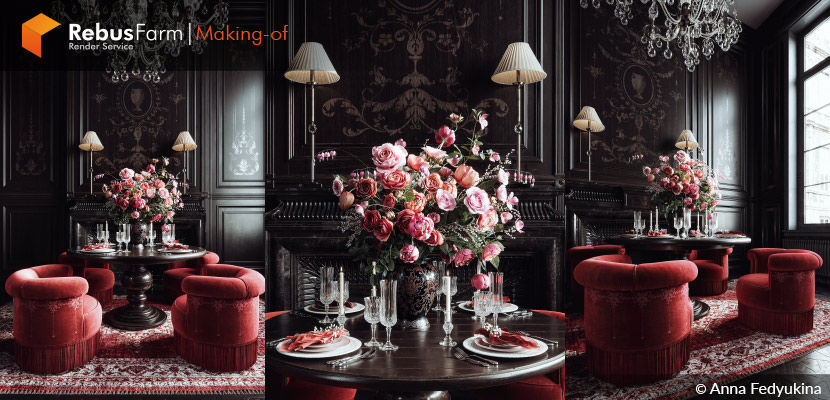
Transforming a quiet corner of a classic interior into a poetic visual experience requires not only technical precision but a deep appreciation for mood, styling, and artistic expression. In this making-of feature, 3D artist Anna Fedyukina invites us behind the scenes of “Blossom”, a personal project inspired by winter calm and the first signs of spring. Blending rich textures, delicate lighting, and floral details, Anna walks us through her creative journey, from early references and modeling decisions to final post-production enhancements using both traditional tools and AI-based techniques. Let’s dive into the warm, elegant world she crafted with care and artistic sensibility!
About me.
Hello everyone!
My name is Anna Fedyukina and I'm a 3D artist from Ukraine with an architectural background. I have over 15 years of experience in 3D visualization and have collaborated with several interior designers and 3D studios around the world. Besides, I am deeply interested in art and architecture, so I really like my work and enjoy each new project I work on!
Concept and Inspiration.
The idea to create these interior images came on one winter day just before Christmas. The previous year, I was working mostly with classical projects, so I decided to do a personal project in a similar style. I was inspired by a few interior images I found on Pinterest.
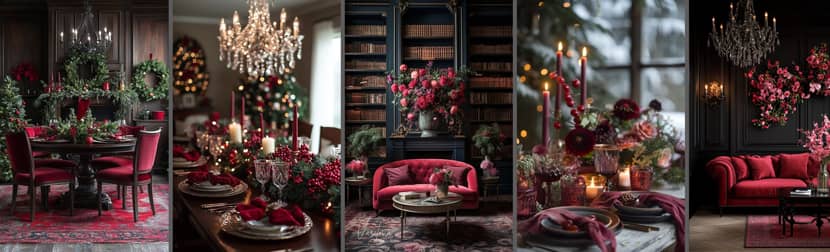
Firstly, I wanted to visualize a Christmas dining table with a lot of holiday decorations, but later my eye fell on some nice images with flower bouquets. So I decided to replace Christmas decoration ideas with nice flowers, for the upcoming spring mood.
Software Used.
The project was created in Autodesk 3ds Max 2024 and rendered in Chaos Corona Renderer 11. For postproduction I used Adobe Photoshop and Leonardo.Ai.
Assets & Styling.
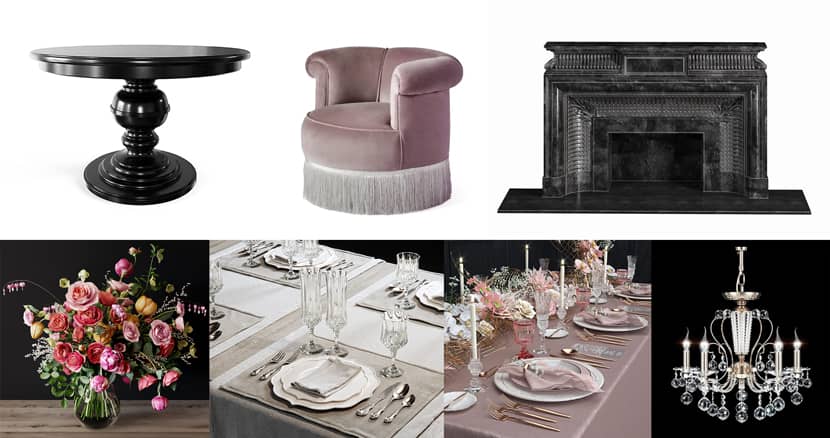
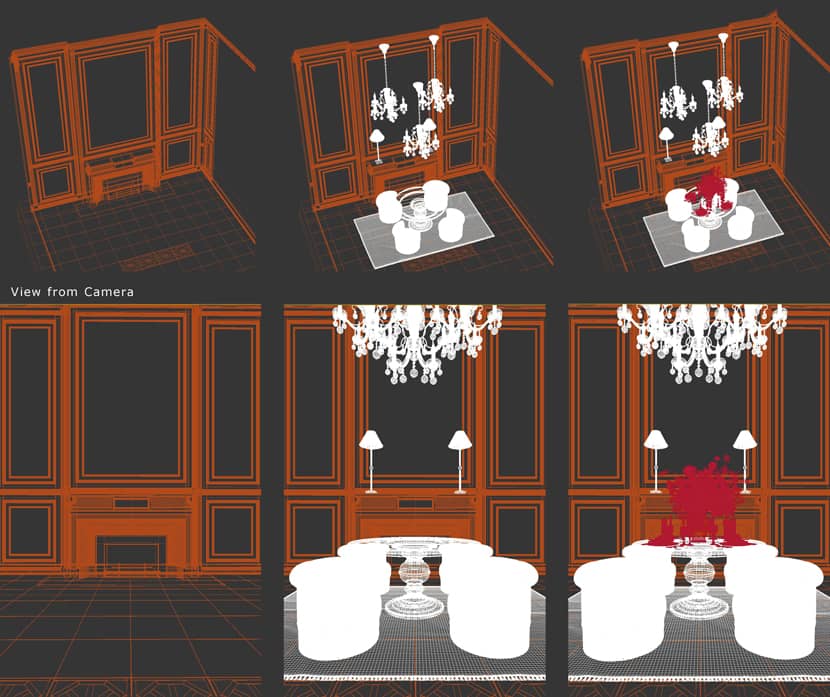
Before starting the modeling process, I gathered 3D models and textures that matched the chosen interior style and my reference images. The scene was envisioned as a composition featuring a round table with a solid central leg, plush velvet armchairs, classic dark wooden wall panels, and a sparkling crystal chandelier.
During modeling, I experimented with various options for the dining furniture, décor, and lighting to achieve the most balanced composition and design. Here, you can see the final model selections.
Modeling.
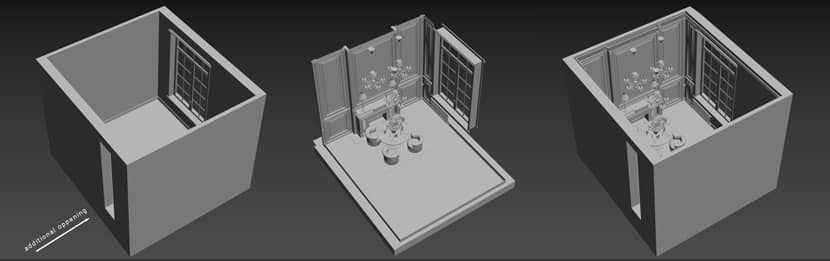
3D modeling for this scene was rather simple, as I found all necessary models for furniture and décor, so only the room walls were left to model.
I created the walls using Splines + Edit Poly, made an opening for a big window, and one smaller additional opening on the opposite wall. This opening will help us to achieve more interesting lighting and reflections.
Then I added the window and the wooden panels. I already had these models in my collection. I just edited them to match the sizes of my room.
After that, I added the floor, furniture and décor. I was focused only on the corner of the room that would be visible from the cameras, so the rest of the room is empty. We don’t have any mirrors or other reflective surfaces in the camera view, so no need to make the scene heavier with additional geometry.
Materials & Texturing.
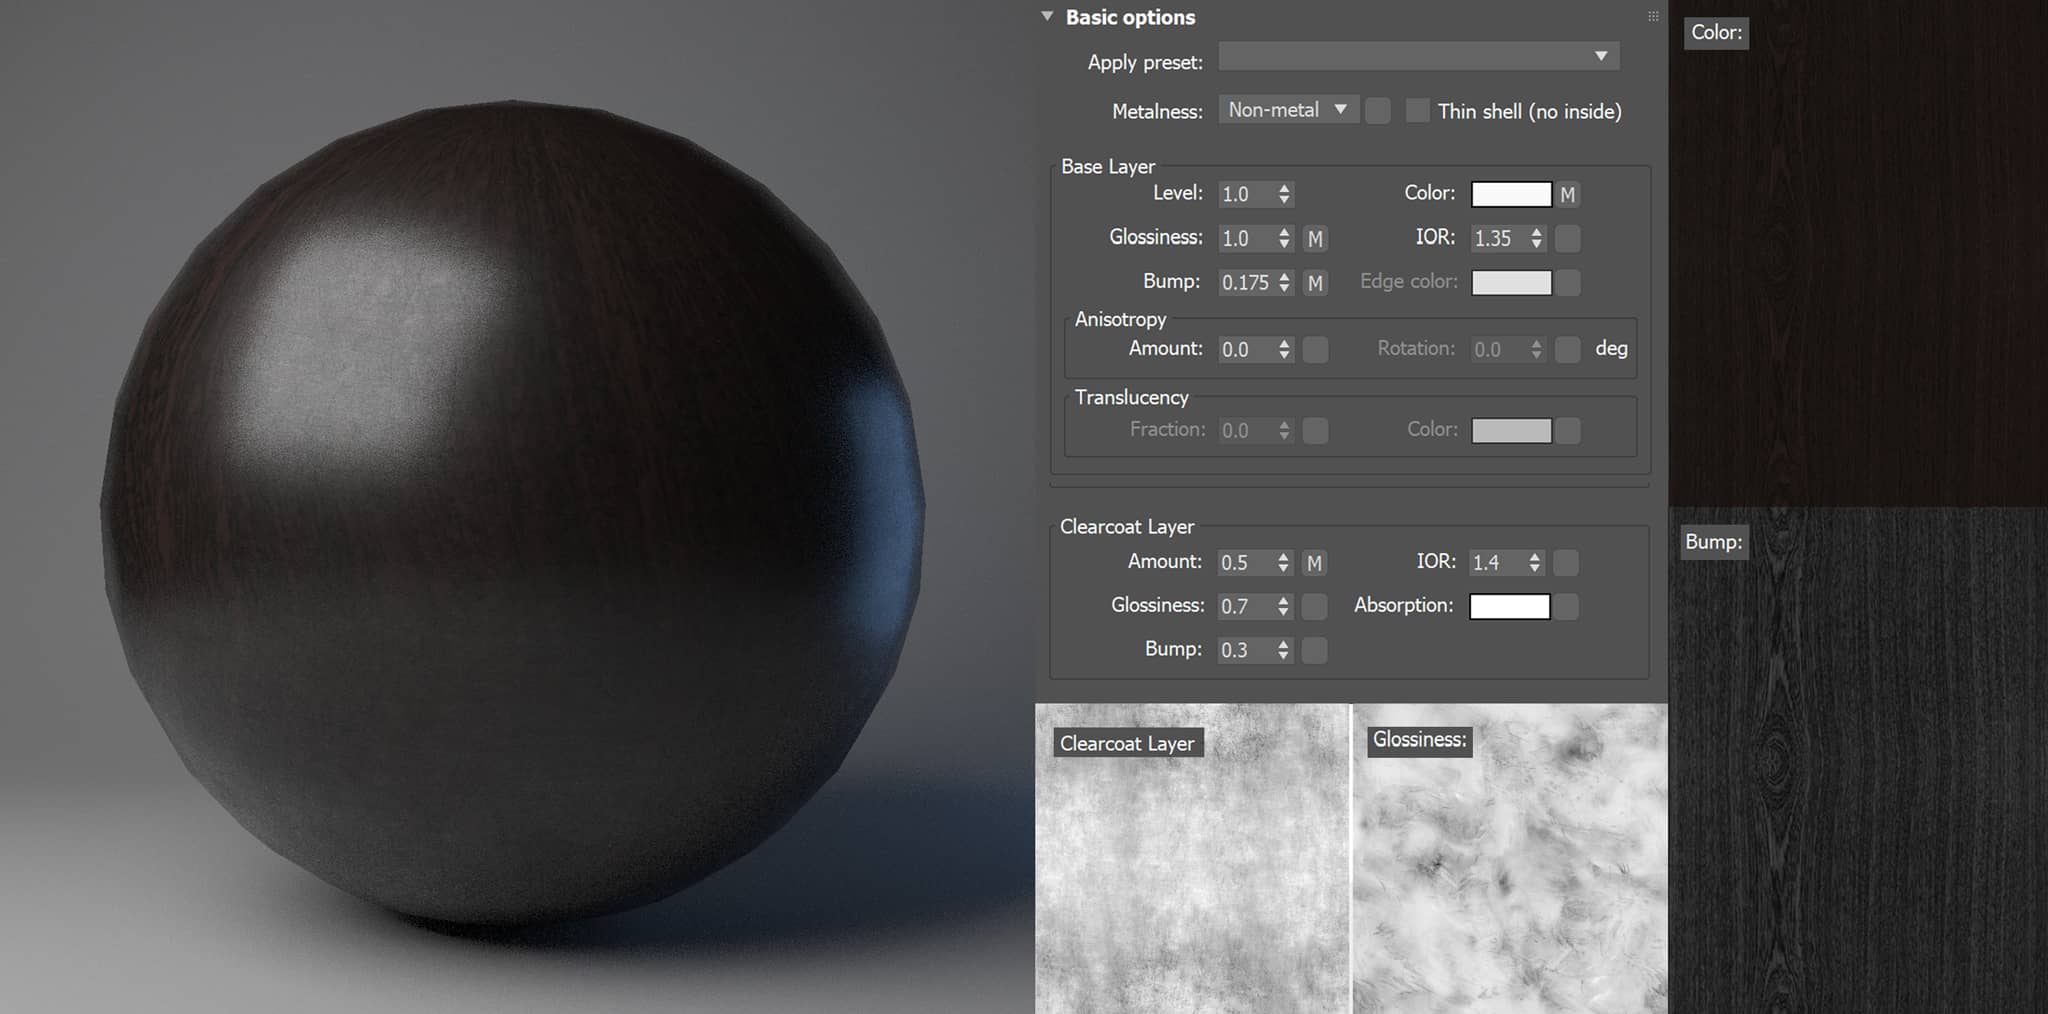
I usually create all the materials from scratch or sometimes edit the existing materials from stock models according to my lighting and tone mapping. In this scene, I started with wooden panel material, as this material covers the bigger part of our image.
I used 4 textures for the base wood:
- Dark wood for the Color
- The same texture, but desaturated and with more contrast for Bump
- Texture with dirt for Glossiness
- Small scratches texture for Clearcoat
I wanted to do some interesting classic floral ornament on the wall panels, and found the image on Pinterest that ideally suits the sizes of my panels (one bigger ornament in the middle and the smaller on the sides).
This image was in low resolution, so I used an AI upscaler to get a better quality image with higher definition. I used Leonardo.AI, for this type of ornament images; it worked well with “Legacy” mode and “2D Art & Illustration” style.
I then edited the upscaled image in Photoshop to create a black and white mask, which I could use directly in 3ds Max.
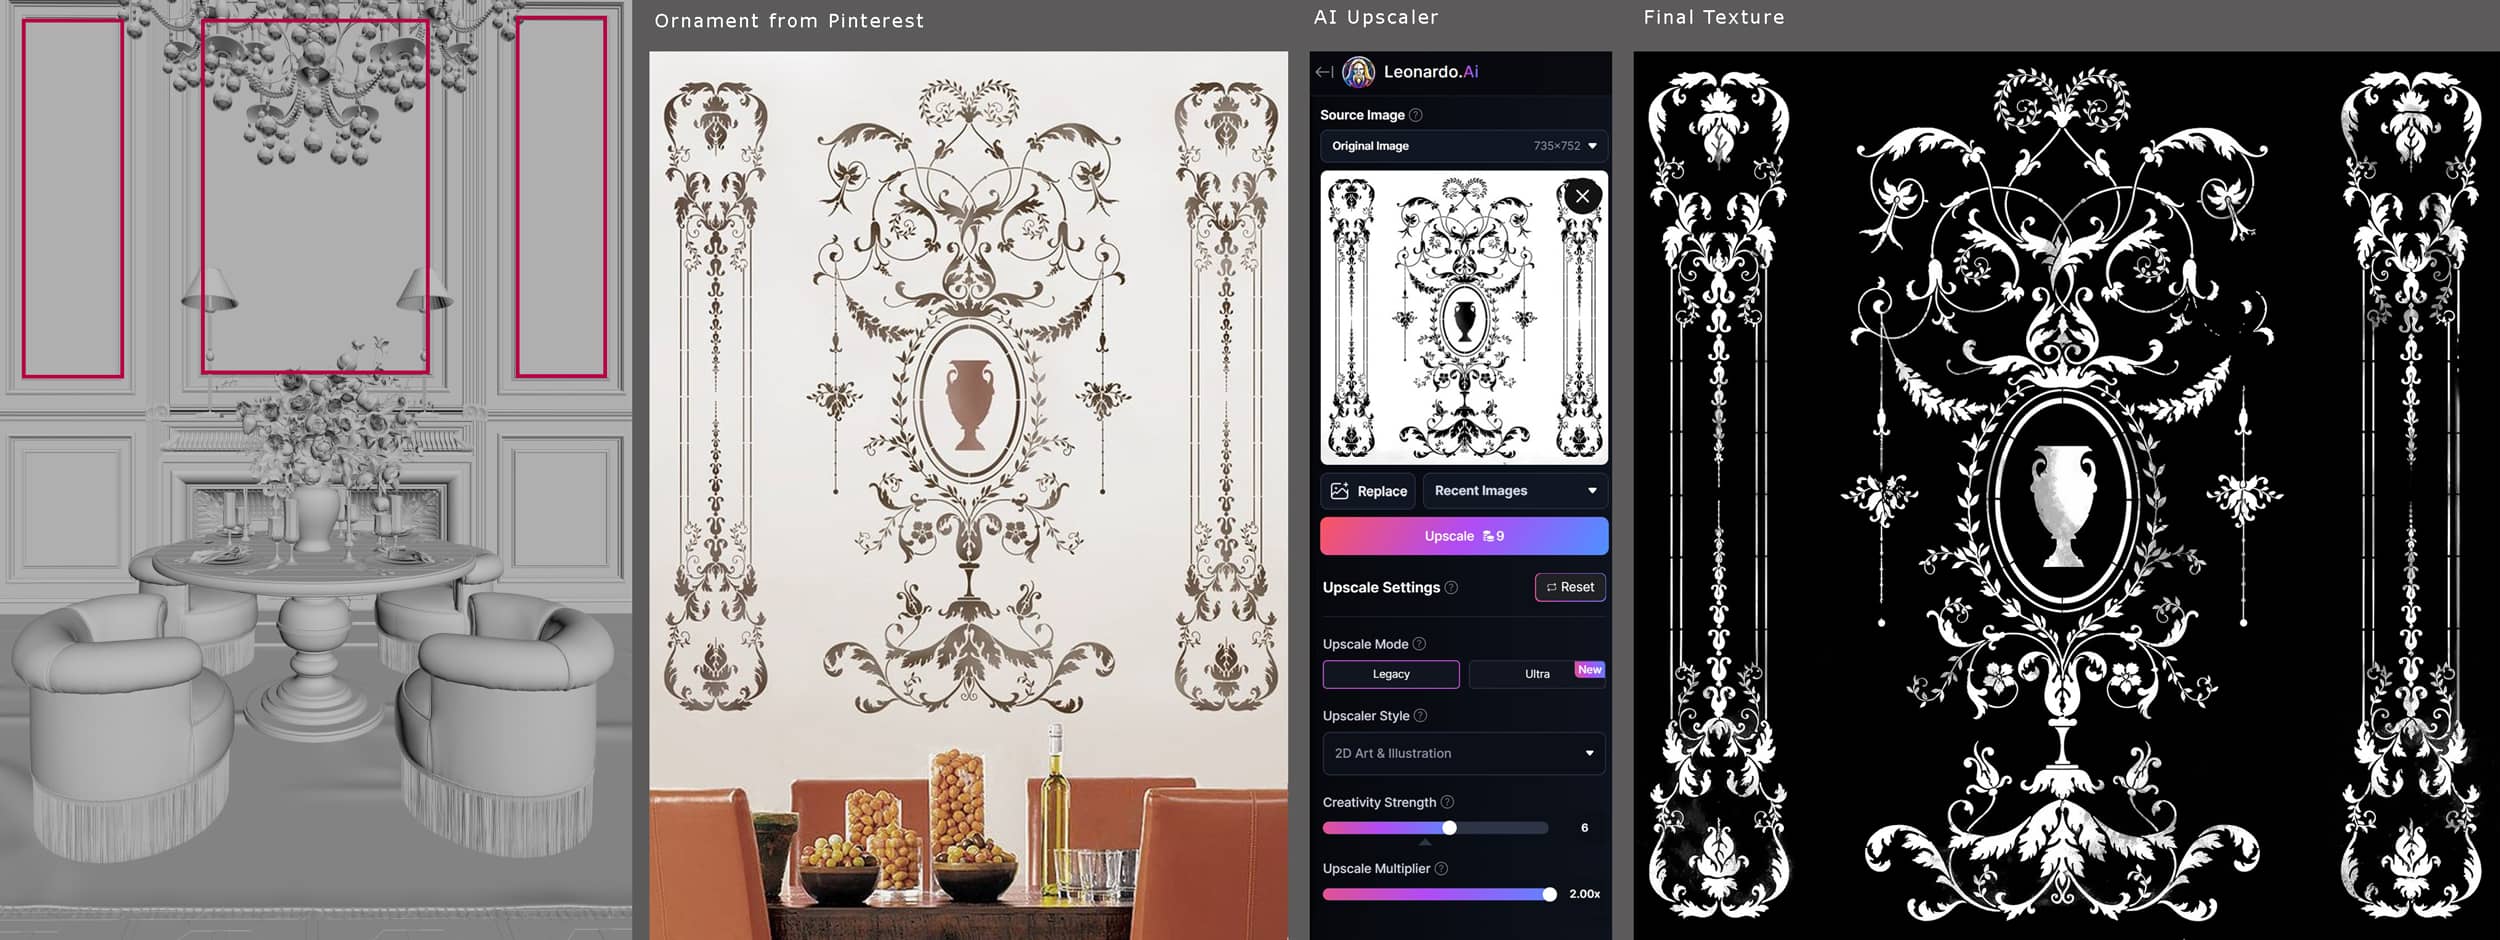
For the final wood material with ornament, I used CoronaLayeredMlt, where I mixed my base dark wood and lighter wood material using the ornament mask.

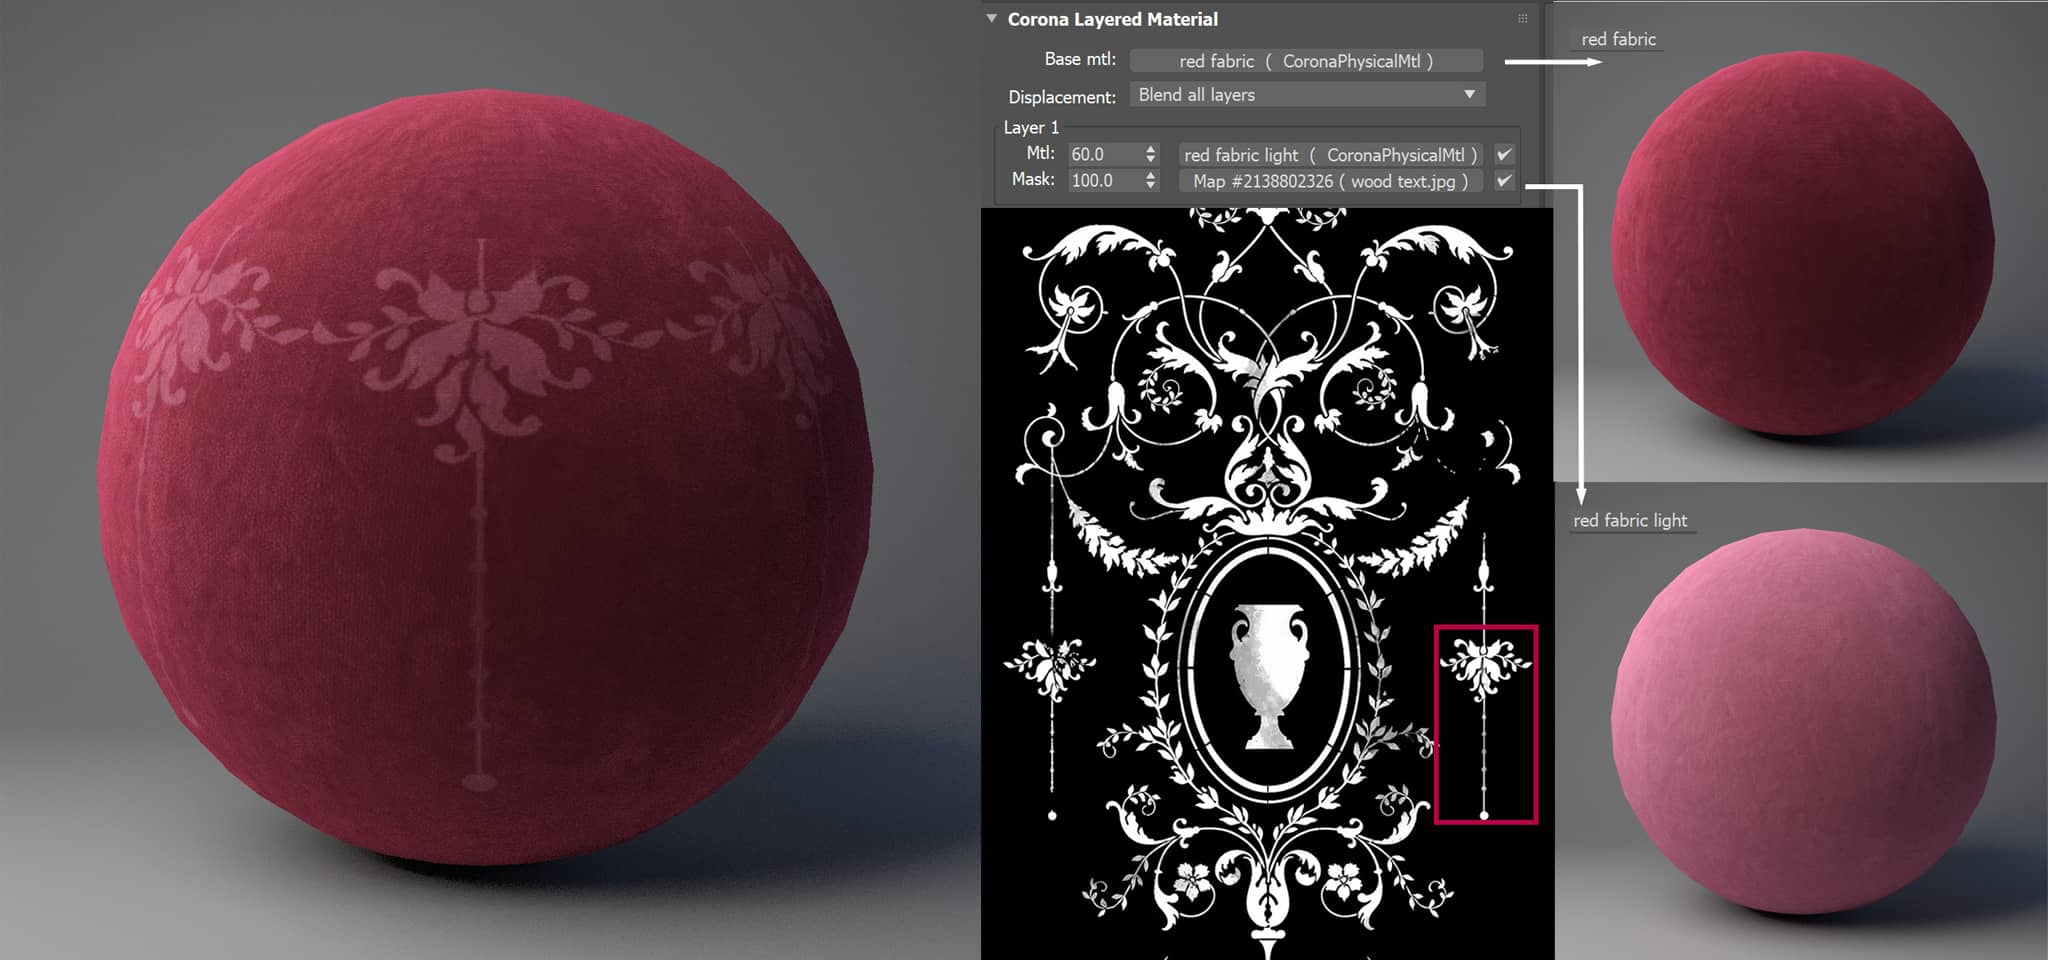
The second important material in my scene was the chair's velvet fabric. I used a Falloff map to create fabric color and a mix of 3 textures for the bump.
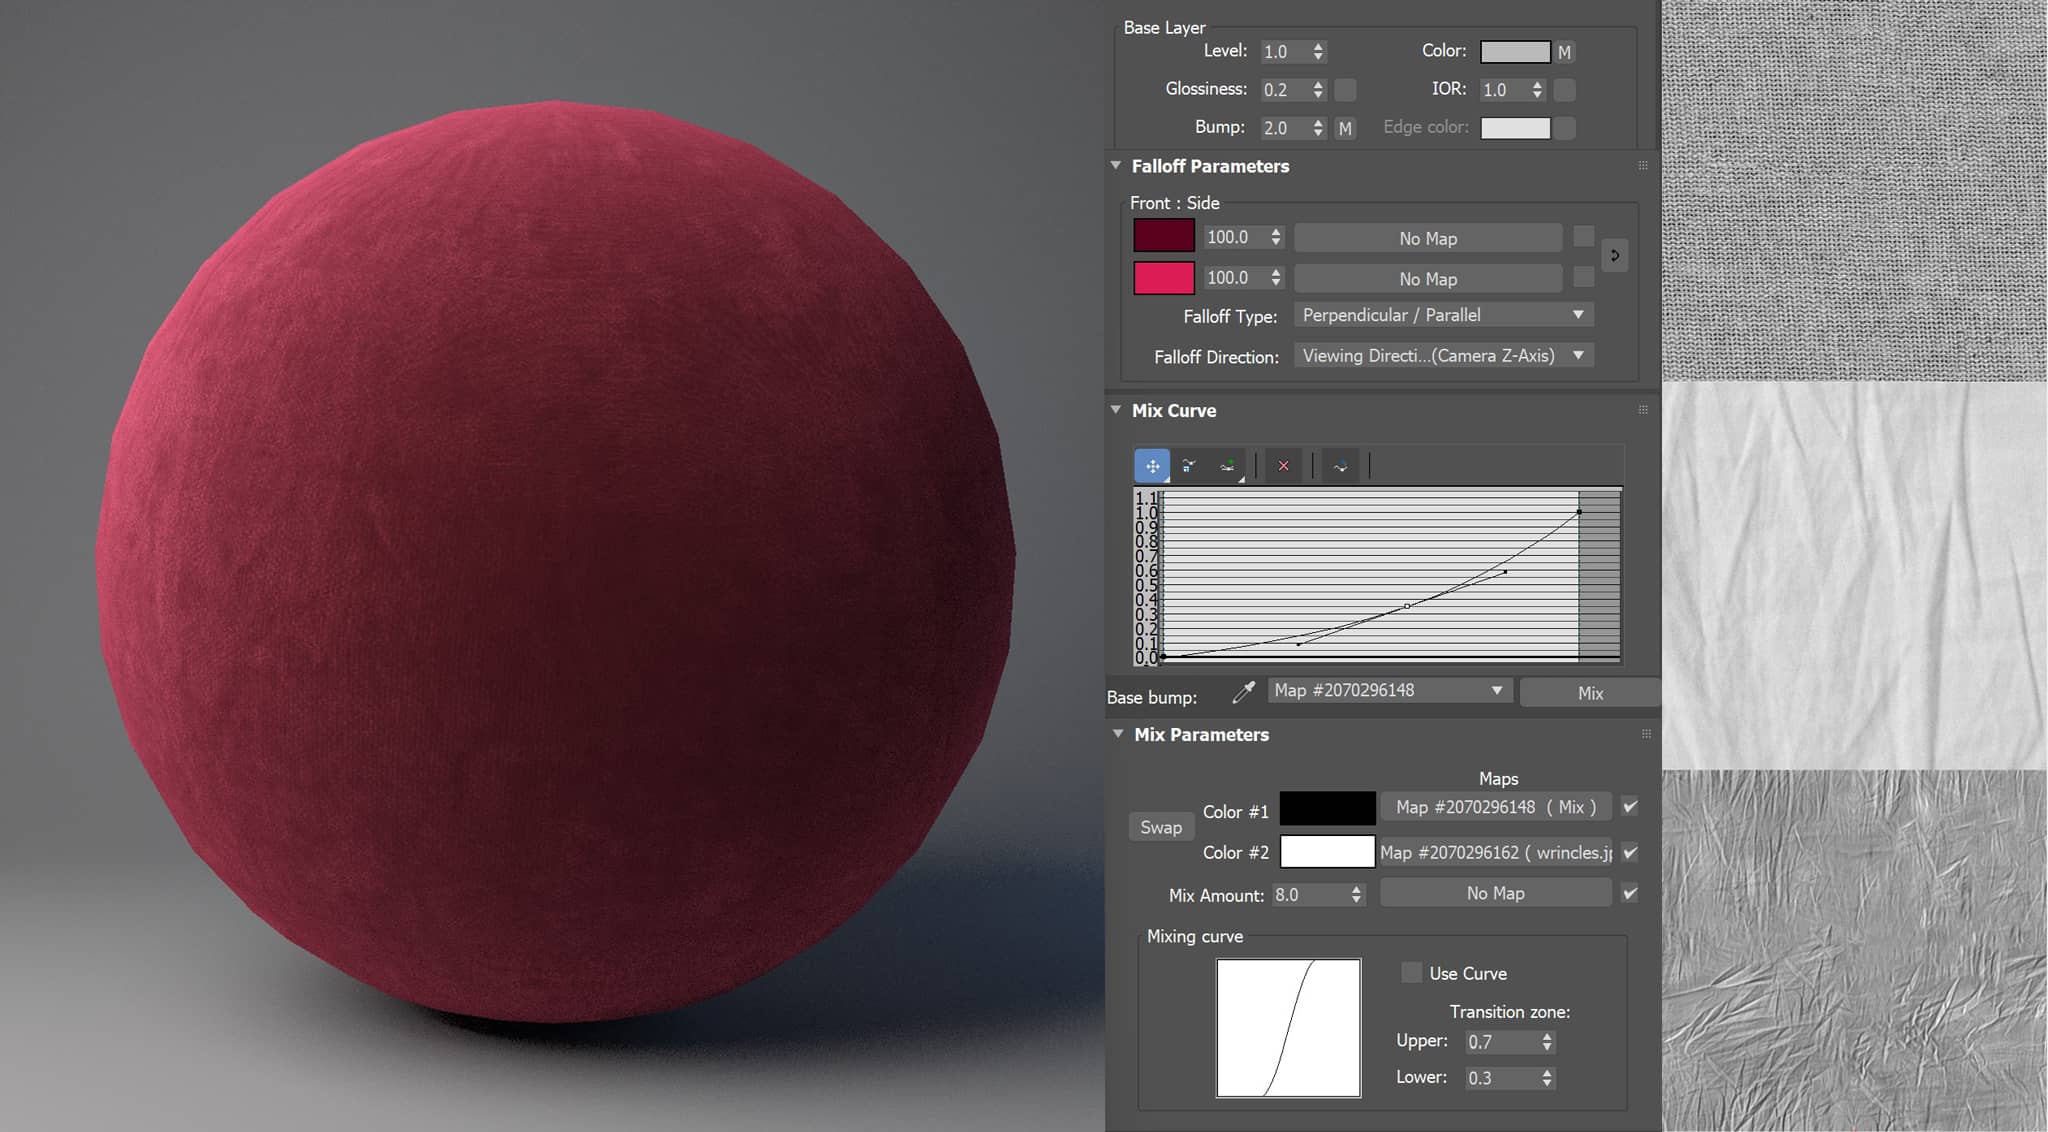
I also wanted to add some floral ornaments to the armchairs and for that reason, I used CoronaLayeredMlt again. I mixed two shades of red velvet fabric by the mask. I took the part of the same ornament mask, using the crop tool and tiling in CoronaBitmap.
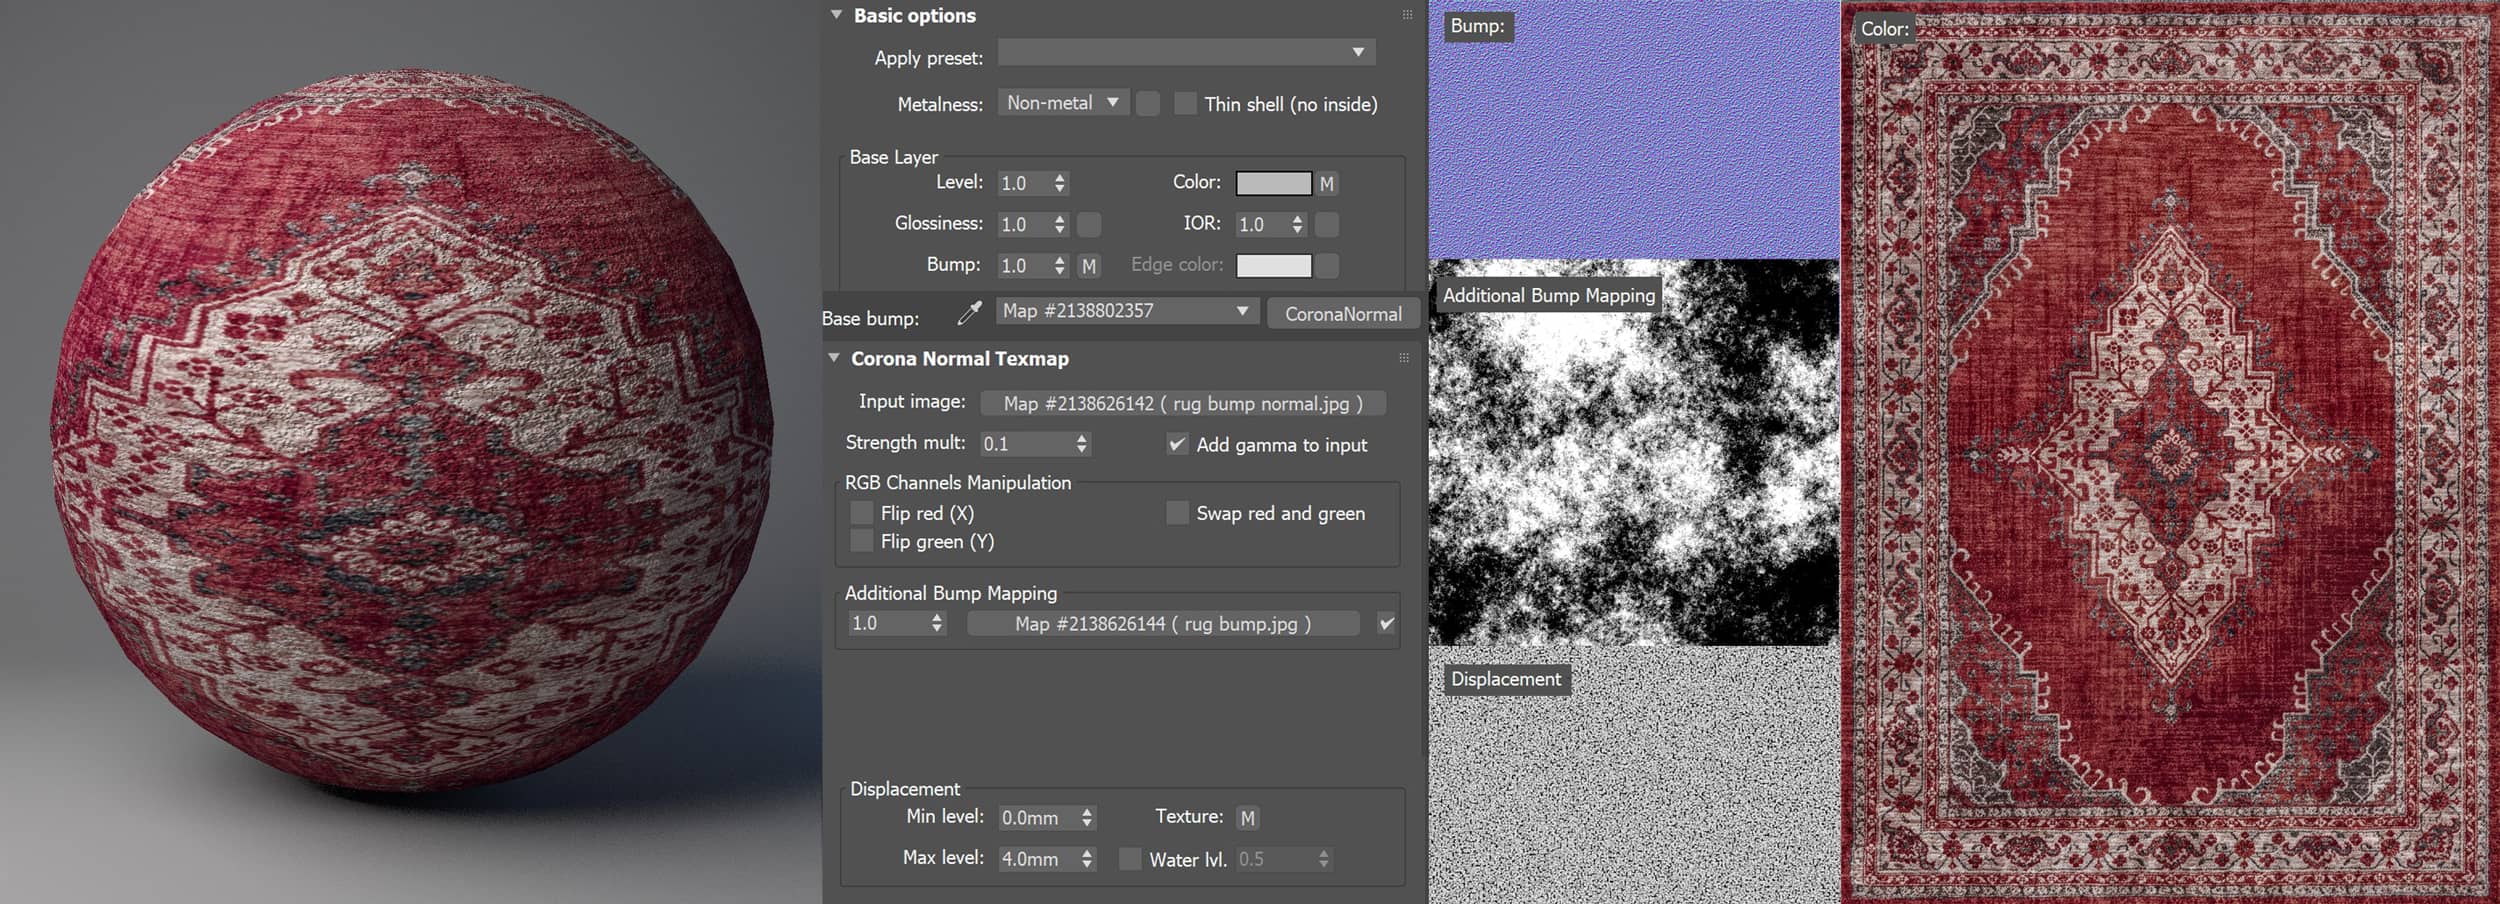
The carpet also took a lot of attention on the renders, so it was important to have good-quality textures for it as well. I found a nice carpet on Pinterest and upscaled it with AI using this image for the Color slot. After that, I added 2 bump textures and one for displacement to achieve a nice pile on the carpet.
Lighting.
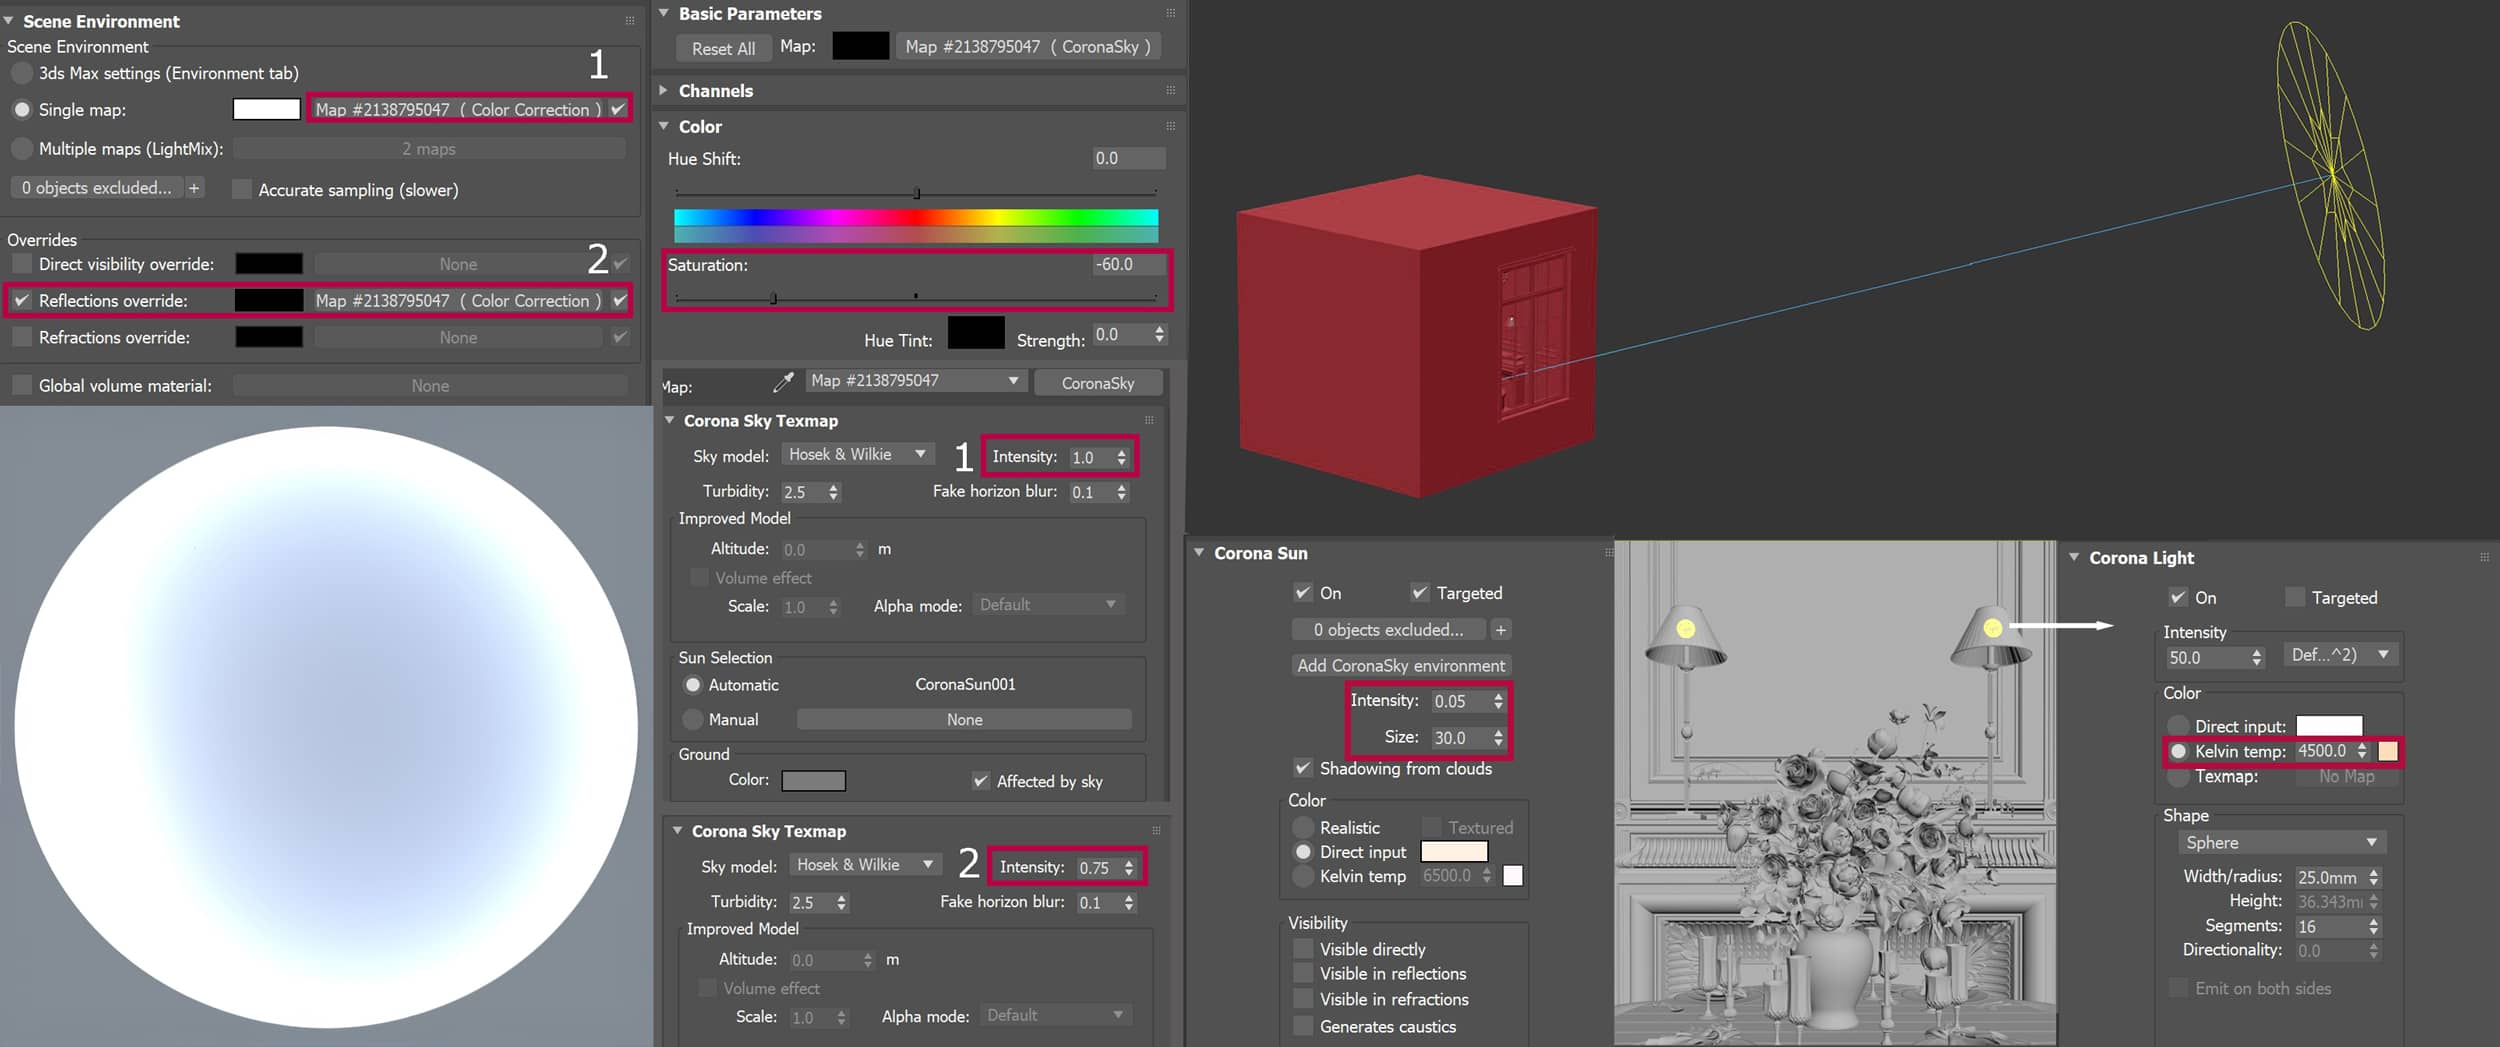
To illuminate the scene, I used the common and simple Corona Sky + Corona Sun workflow. For Corona Sky I chose Hosek & Wilkie Sky model.
In this particular case, I liked the shadow from this older sky model more than the default PRG Clear Sky model. I then desaturated the sky color with the Color Correction map to create a feeling of overcast weather with more grey sky. The reflections from this sky were too bright for the final render, and I used the copy of the Corona Sky map with decreased intensity (0.75) and put it in Scene Environment - Reflections override.
The Corona Sun looking directly at the window using a small intensity (0.05) and set the size amount to 30 to achieve light, blurred shadows to support an overcast weather feeling.
Except for the natural lighting (Corona Sky + Corona Sun), I added Corona Lights to the wall light models. I used warm lighting (4500 Kelvin Temp) to add a more cozy impression to the interior.
I always start testing the interior lighting with a grey color material override, as it gives me a better understanding of shadows and shape composition. I set tone mapping in Corona Buffer during grey renders tests and usually, I do not change the default setting too much. In this project, I used a LUT (Adanmq_Advantix_100) with a 0.350 opacity amount.
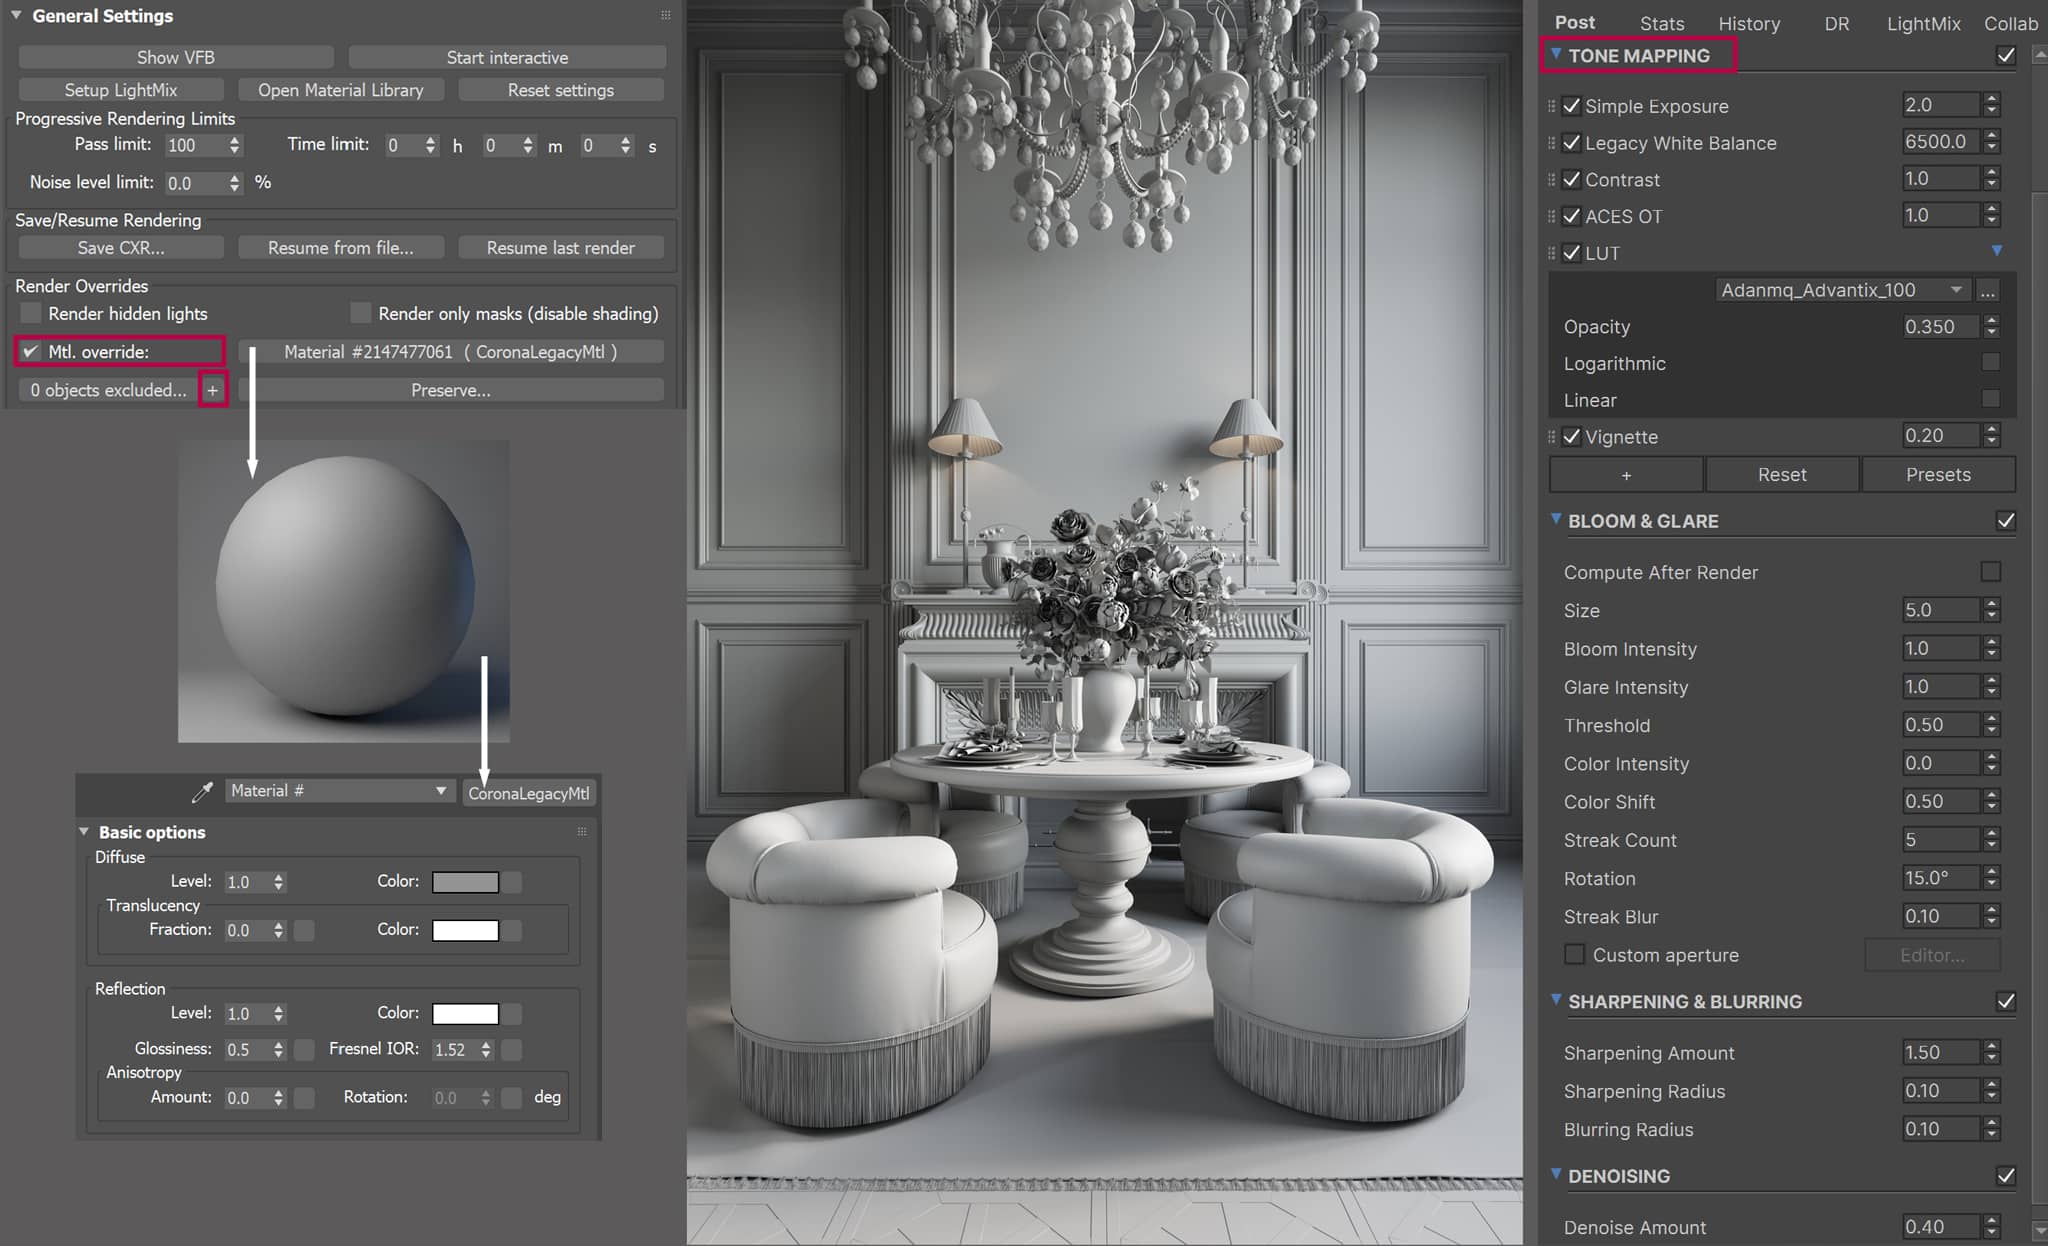
To test the materials in the scene with lighting, I used the “objects excluded” button and started testing the materials step by step, adding the models to the excluded list.
Finally, I removed the material override to check how all materials work together.
Post-Production.
As we had the final render from the Corona Render buffer, it was time for a final touch – postproduction. I only used some quick adjustments in Photoshop, as in the age of AI, I was able to test AI tools to improve my images.
In this case, I used Universal Upscaler (Enhancer) from Leonardo AI to improve some details of the final renderings. I used Ultra Mode and Realistic style. The enhancer has “Advanced Settings” where I chose the creativity stretch, details contrast and similarity. I made tests with different amounts for these settings and selected the best possible results.
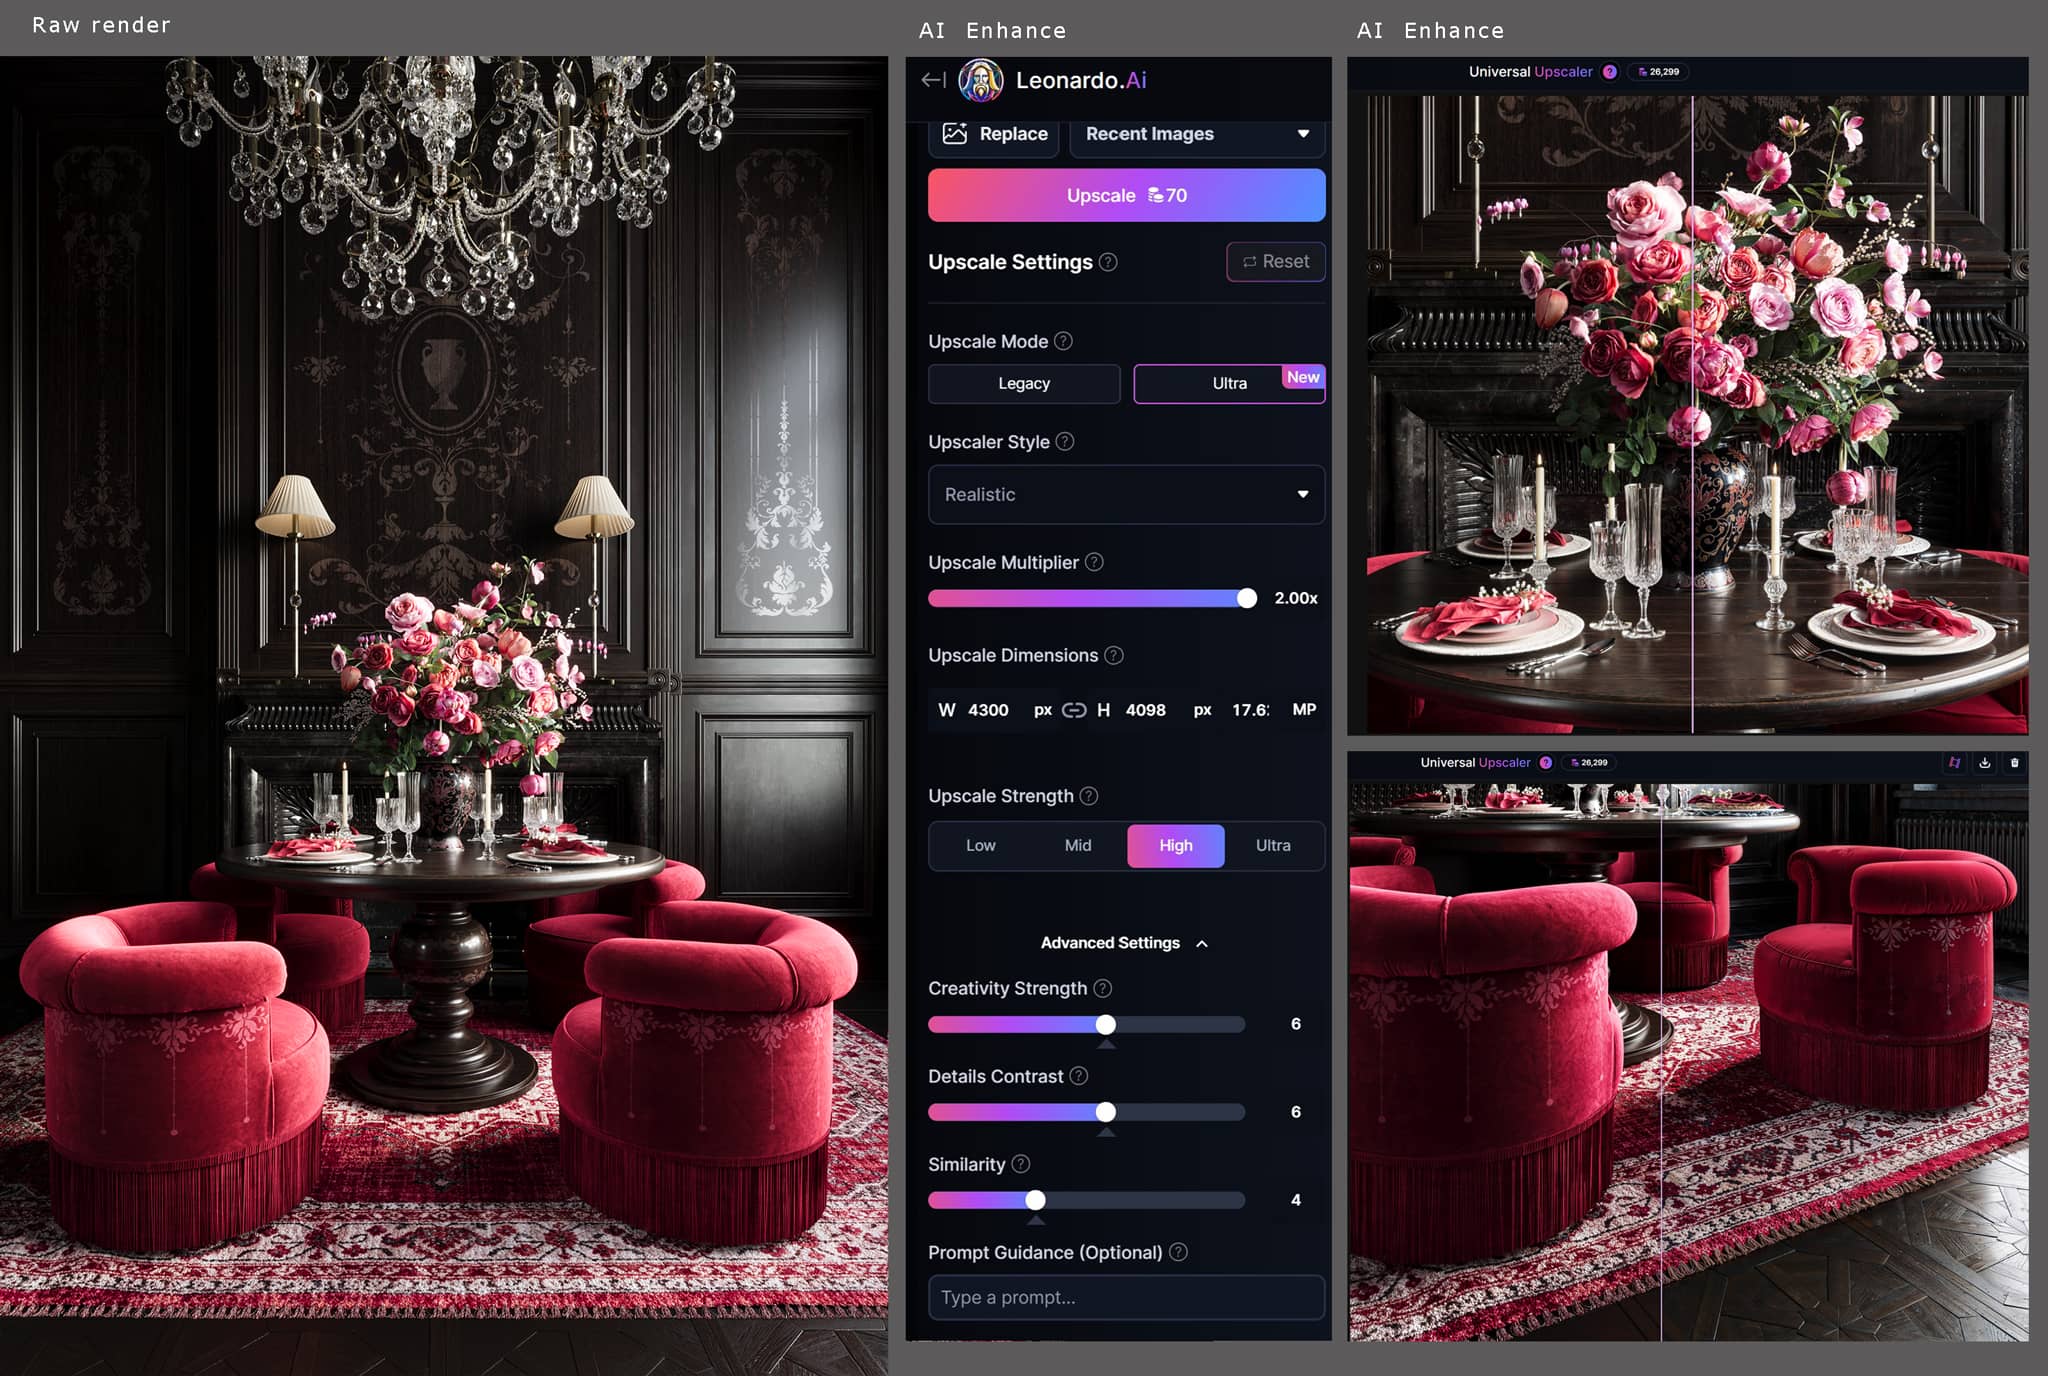
I only needed to improve some details, such as flowers with branches, wooden parquet texture, and scratches on the wooden table. So, I decided to use parts of the enhanced images and composed them with the original raw render in Photoshop.
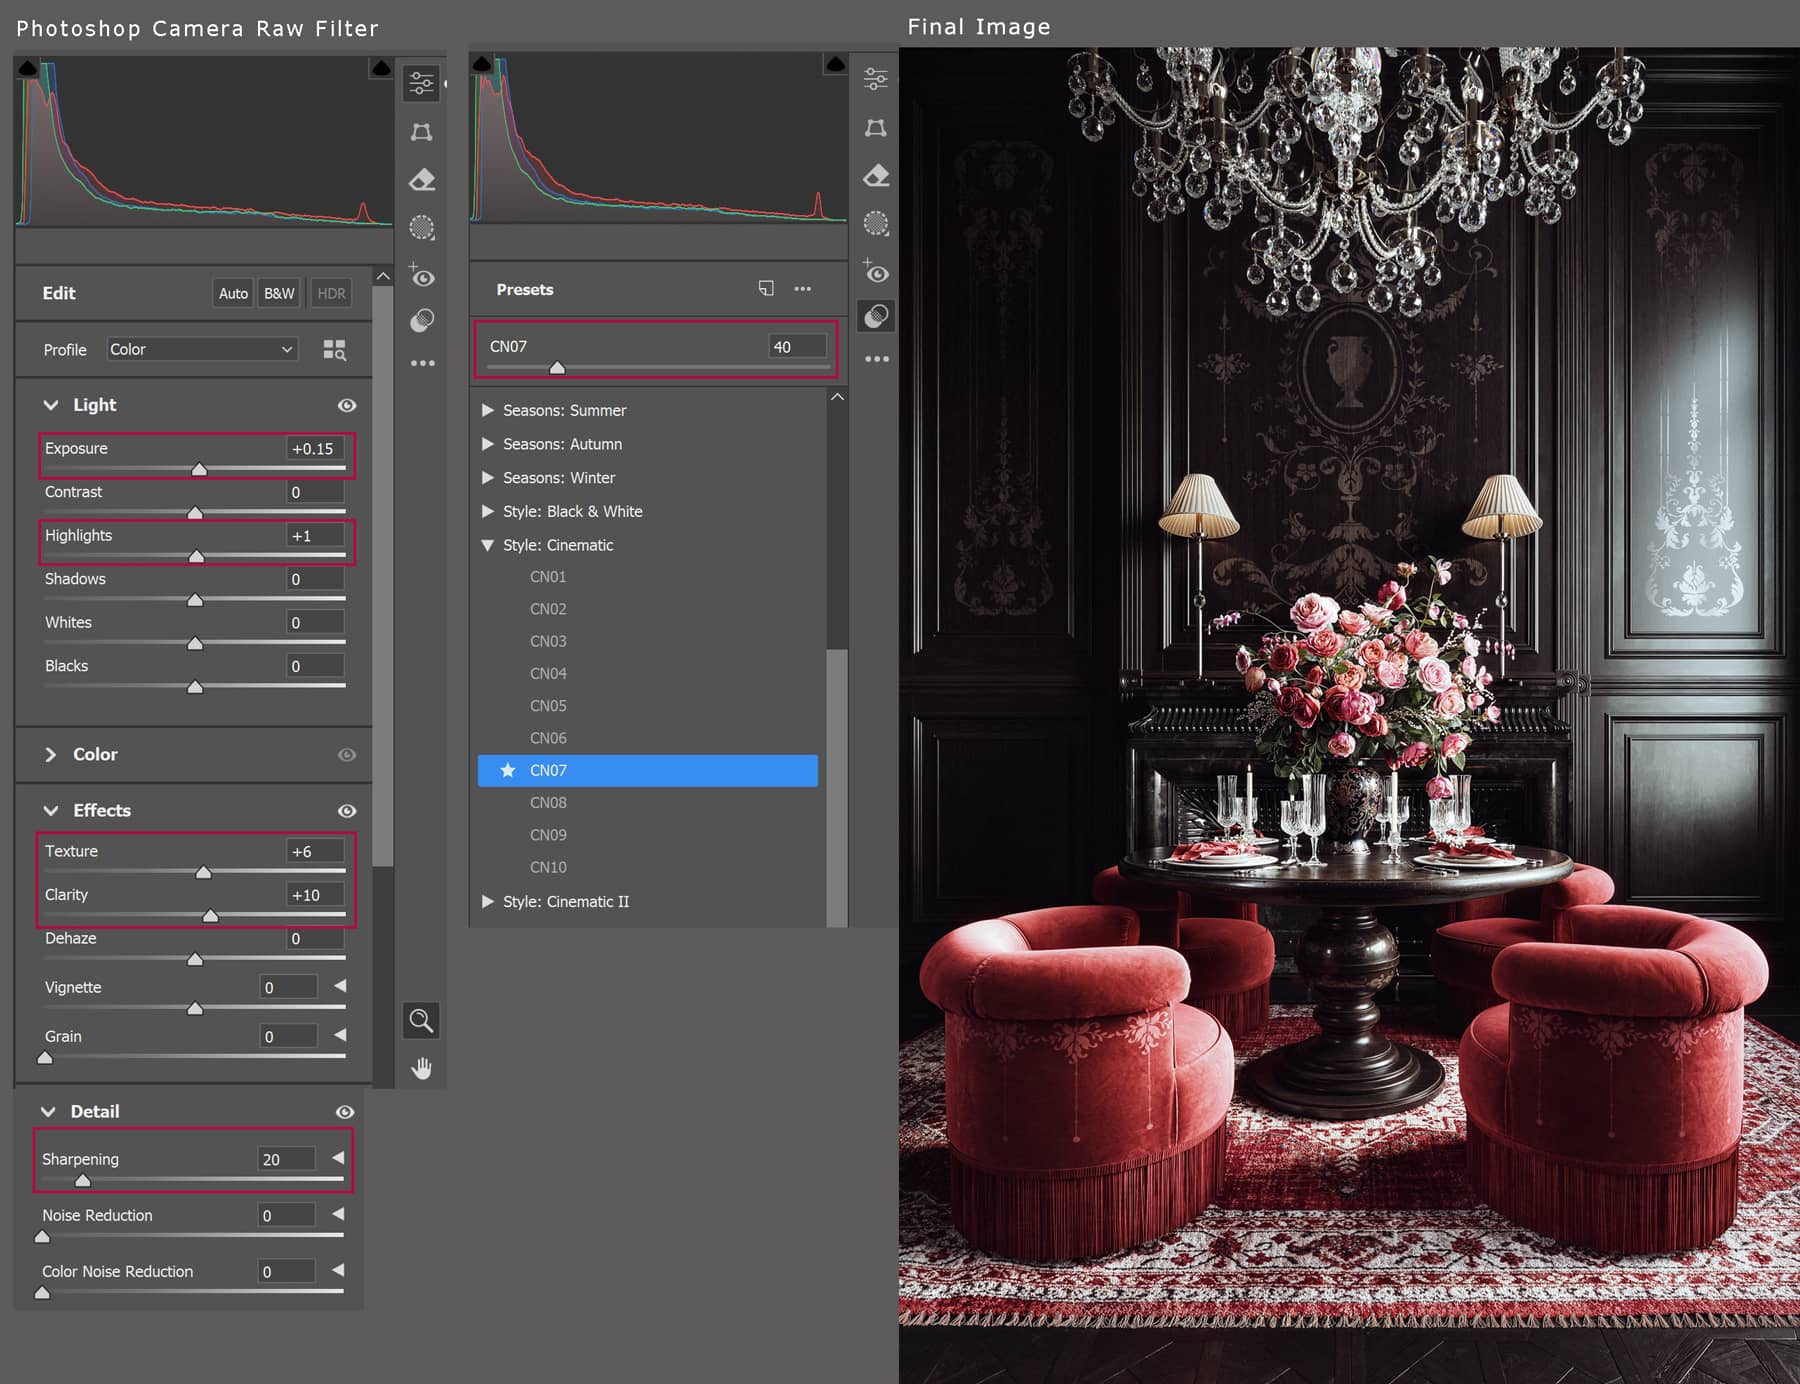
I also added the Photoshop Camera Raw Filter to correct a bit of the exposure, clarity, sharpening, etc. This filter is very useful, as we have a lot of adjustments in one place. Camera Raw Filter also has nice filmic presets, and I used CN07 with an amount of 40.
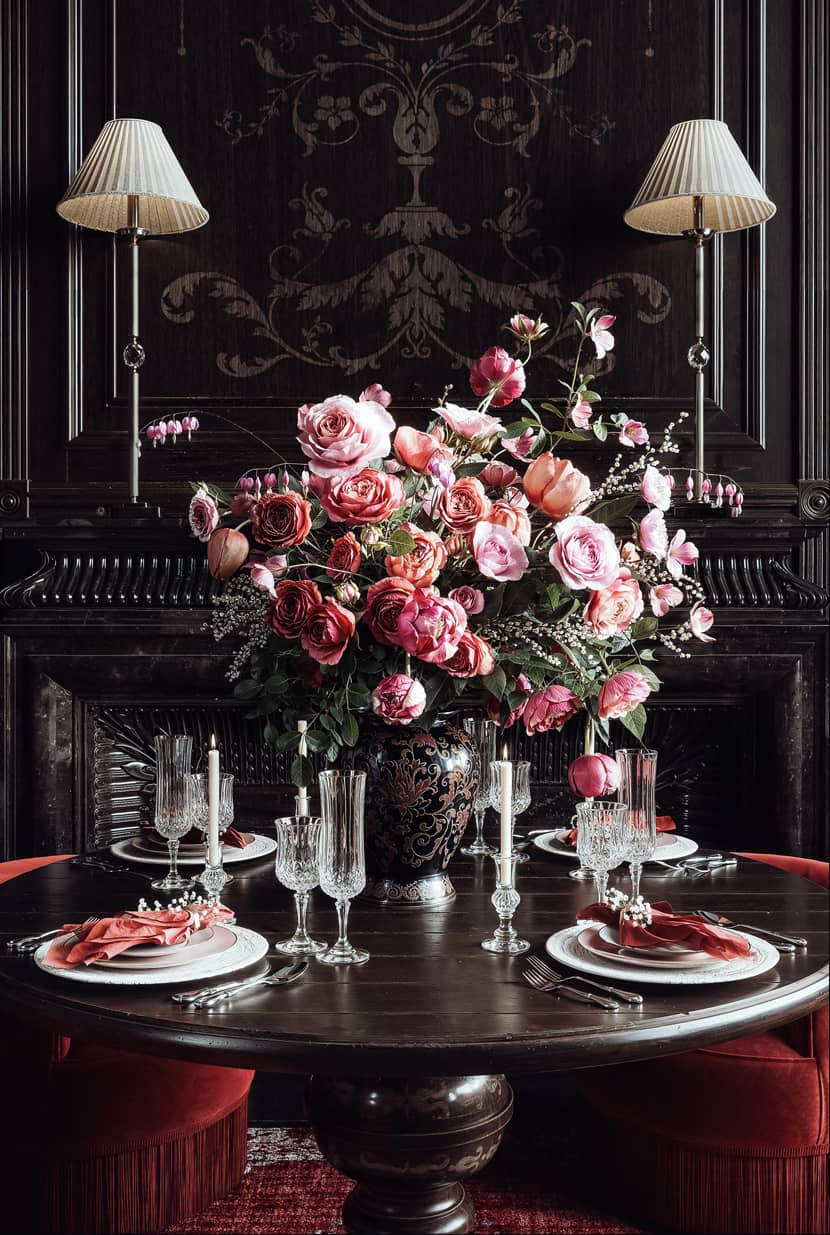
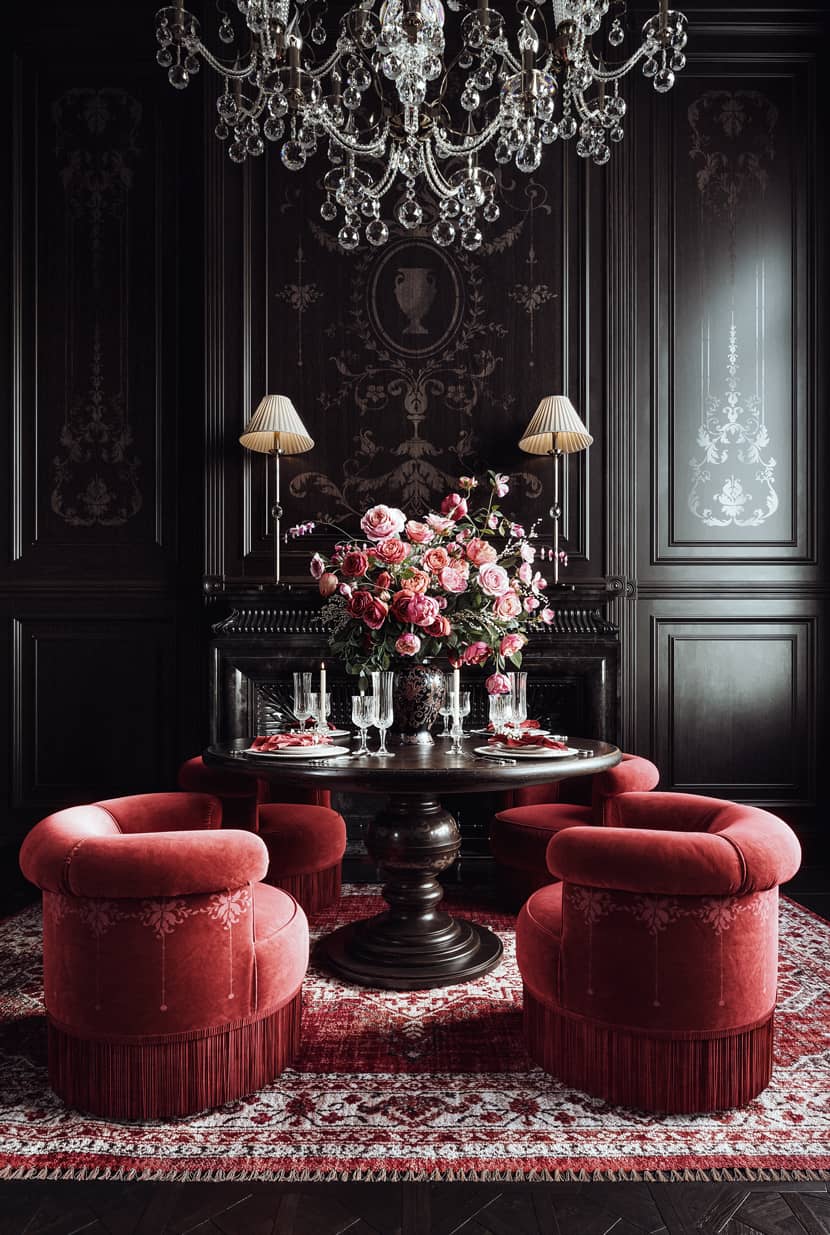
Final Images.
Below are all the final renders with postproduction.

Summary.
Thank you for reading my article, and I hope you found some useful tips to improve your workflow. Let's connect and let me know your thoughts!!
Best,
Anna Fedyukina.

About the artist
Anna Fedyukina is a 3D artist from Ukraine with a background in architecture and over 15 years of experience in architectural visualization. Throughout her career, she has collaborated with interior designers and visualization studios, bringing projects to life through a combination of artistic intuition and technical expertise. Passionate about art and architecture, Anna channels her creativity into highly detailed, emotionally resonant interior scenes, where every light, texture, and decorative element tells a story.