
Few technical ideas in the field of 3D graphics have as much of an impact on performance and visual quality as texel density. It's one of those things that, if ignored, can ruin immersion right away, but when done well, guarantees that every item appears polished, consistent, and ready for production. You can influence how textures appear and act across your models by knowing texel density, whether you're creating large worlds for AAA games, displaying architectural visualizations, or refining a portfolio project. Read this article to brush up on your 3D expertise or even to learn something new today!
The definition of texel density, its significance, its calculation, and its application to various tools and workflows will all be covered in this guide. By the conclusion, you'll understand precisely how to strike a balance between optimization and visual integrity, as well as how to steer clear of the mistakes that cause textures to appear erratic.
What Is Texel Density?
The quantity of texture pixels, or Texels, that are visible in a 3D model per unit of space is known as Texel density. Put more simply, it gauges the amount of texture detail that is crammed onto the surface of a model. Realism and consistency will be broken if two assets in the same scene have drastically differing Texel densities; one will appear too sharp, while the other will be blurry.
Artists guarantee that textures on various objects, irrespective of their scale or resolution, visibly match by establishing and preserving a consistent Texel Density. This idea is particularly significant in real-time rendering and game creation, where consistency and optimization are crucial.
In this video below, Josh Antonio explains very fast what Texel Density is. It isn't a fully comprehensive look into our topic, but you should get a good understanding of what it is and why you need to consider it as you lay out your UV tiles.
What Is a Texel in 3D Graphics?
Similar to how a pixel is the smallest unit of a 2D image, a texel, which is short for "texture element," is the smallest unit of a digital texture map. In a 3D model, the color and shading information carried by each texel is mapped onto polygons. The sharpness and clarity of surface details, such as wood grains, fabric weaves, or metal scratches, are defined by texels when viewed at close range.
Those details get blurry if the texel density is too low. Performance is impacted if it is set too high since resources are squandered on an excessive texture resolution.
A more technical explanation could be this one: Image regions that are acquired using straightforward techniques like thresholding can likewise be used to define texels. Their spatial relationships can be defined via voronoi tesselation, which divides the texture at the midpoints between each texel's centroids and the centroids of all surrounding texels. Each texel centroid is thus surrounded by a Voronoi polygon, which is made up of all points that are closer to its own texel centroid than to any other centroid.
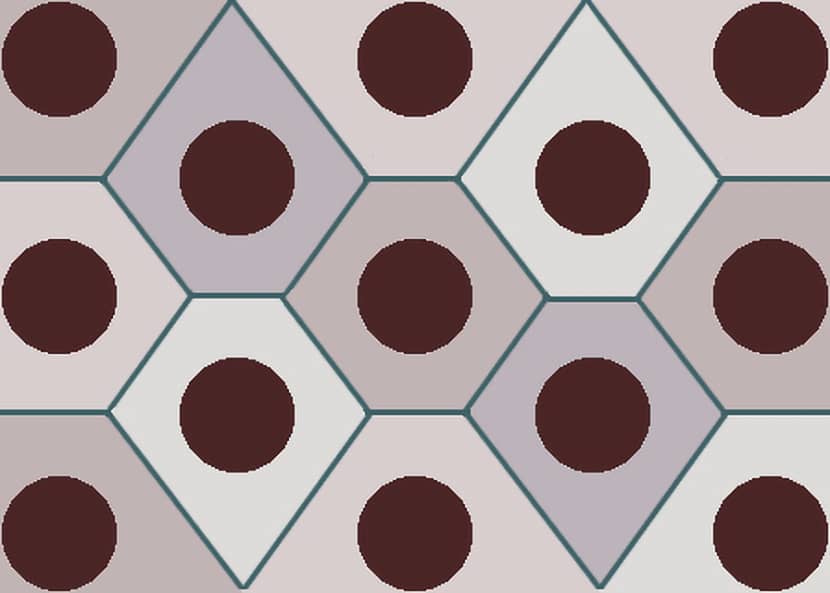
Voronoi polygons for a group of texels.
Why Is Texel Density Important in Games?
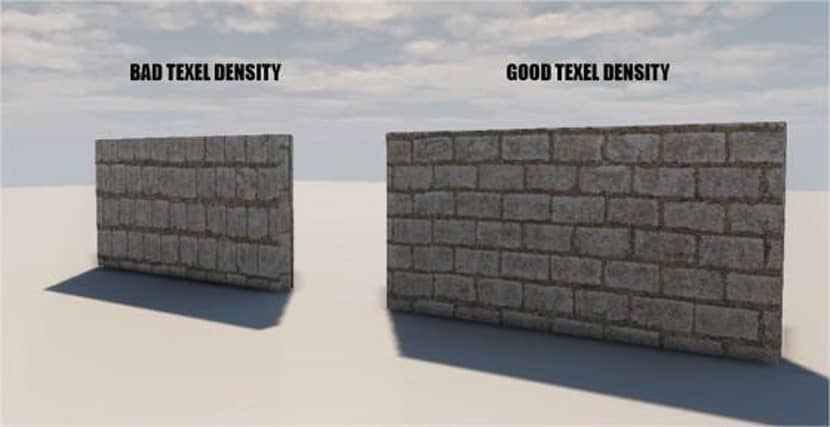
Texel density has a direct effect on immersion in games. When you approach a complex door in a first-person game, the wood texture appears blurry, yet the character's weapon is incredibly sharp. Players are distracted by these discrepancies, which also detract from the visual storytelling.
All things will appear to belong in the same world if the texel density is kept balanced. Because textures are some of the heavier elements in a project, they also aid developers in optimizing performance. A well-controlled texel density prevents needless GPU load as well as visual breakdowns.
Another, more detailed and brilliant explanation is described in this 20-minute video tutorial by Huge Menance. According to the author, "Texel density is essential for maintaining the right texture sizes in real-time graphics applications such as games. It helps prevent over-detailing, under-detailing, and wasted detail due to downsampling. Additionally, it prevents unnecessary VRAM wastage by ensuring that textures are appropriately sized for the objects in the game world. In a static rendering context, it also helps to improve render speeds and reduces the amount of RAM required for textures in large and complicated scenes."
Factors That Influence Texel Density.
Texture resolution and object scale are the two primary determinants of texel density.
When a 2K texture is applied to a little mug, it will appear incredibly sharp, but when it is spread across a large wall, it will appear hazy. Similarly, texel density balance can be broken if you scale objects in your 3D scene without changing their UVs. The secret is to find the sweet spot where the texture resolution corresponds to the size and significance of the object in the scene.
How to Choose the Right Texel Density?
The project will determine which texel density is best. To ensure uniformity, studios frequently establish a texel density guideline early in the production process. For instance, a standard might be 5.12 px/cm for background props and 10.24 px/cm for hero assets.
In more detail, we found a great and extremely informative video by Paul H. Paulino who shares a technique that he uses in his projects to establish their correct texel density. This method can help you with your projects, so you can have textures with good resolution without having a model with an unnecessary amount of UDIMs.
What Is the Screen Relation Method?
The size of an object's screen appearance is used by the screen relation method to determine its texel density. Because the player sees the weapon up close, a first-person weapon could require a significantly greater texel density than a background building. Crucial elements in texel allocation are camera distance and anticipated zoom levels.
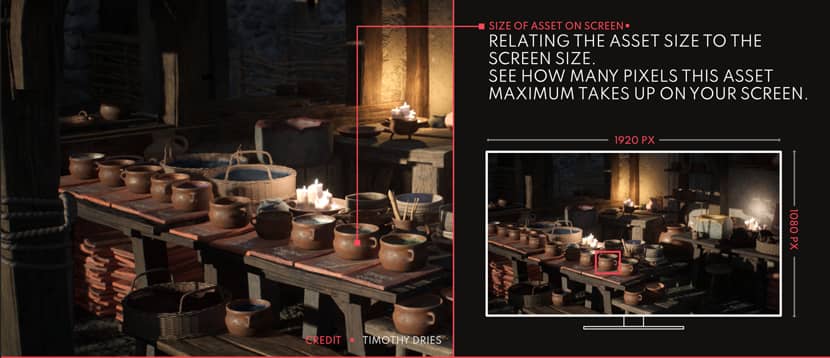
Source: Beyondextent.com
How Should Personal Projects Be Approached?
Efficiency is just as important as consistency for students and amateurs creating portfolios. It's tempting to utilize 8K or 16K textures everywhere, but doing so rarely results in a proportionate improvement in quality and frequently degrades speed. Artists should instead concentrate on balance: rendering smoothly while being sharp enough to highlight details.
How to Calculate Texel Density?
The following formula can be used to determine texel density: Texture Resolution / Object World Size = Texel Density
For instance, the texel density is 1024 px/m, or approximately 10.24 px/cm, if a 1024×1024 texture covers an object that is 1×1 meter in size.
The majority of artists use checks or add-ons to expedite the process; however, manual computation is still feasible. Density among assets may be quickly visualized with Blender, Maya, and 3ds Max tools.
Using Texel Density in Different 3D Programs.
To alter texel density, each major 3D program has its own tools or plugins.
Texel Density in Blender.
Users of Blender can depend on add-ons like Texel Density Checker. With the help of this tool, artists may visualize UVs, select a goal density, and scale islands to match it. Workflow is made simpler by the add-on, which also guarantees uniformity in intricate settings.
3DMegaverse has shared a good video tutorial on how to use this method in Blender:
Texel Density in Maya.
The UV Toolkit is frequently used to access Maya's built-in texel density adjusting tools. When an artist specifies a goal density, Maya automatically modifies the UV shells to match. This expedites the process of preparing for film and game projects with stringent texture budgets.
A quick overview of what texels are and the bare-bone basics of UV unwrapping in Maya by Leon Cabrera:
Texel Density in 3ds Max.
Similar capability is provided by scripts and plugins like TexTools, which are used with 3ds Max. These tools assist artists in standardizing textures across scenes by enabling visual overlays, density checks, and batch tweaks.
This quick video tutorial by FastTrack Tutorials can give you a taste on how it works in 3ds Max software:
Texel Density in Different Game Types.
Not every game has the same requirements for texel density. The distribution of textures depends on the type of camera perspective.
First-Person Games.
Weapons, hands, and doors that are closest to the player in first-person games require a high texel density since players examine them closely. Lower density can be used for background props without compromising immersion.
Third-Person Games.
Because the camera is positioned farther back in third-person games, the character model doesn't require an extremely high texel density. However, more detail could be needed for emphasis elements like armor, weaponry, or dramatic cutscenes.
Top-Down Games.
Strategy games and other top-down or isometric games require far less density overall. Textures can be greatly enhanced without sacrificing quality because the camera stays far away.
Workflow Considerations and Texel Density.
Every workflow takes a different approach to texel density.
Unique Assets.
Consistent texel density guarantees that the model appears crisp from every perspective for one-off props or hero items. For portfolio pieces or cinematography where close-ups are required, this is crucial.
Tileable Textures.
Since repeating patterns preserve clarity, tileable textures eliminate the necessity for consistent texel density. Seams and repetition, however, need to be handled carefully to prevent immersion from being broken.
Trimsheets.
Trimsheets carefully disperse the texel density throughout a UV map. They work especially well in modular environments because they let artists reuse textures effectively without compromising uniformity.
Quick Estimation with Proxy Models.
Artists can test texel density early and block out environments with basic proxy meshes before committing to elaborate models. This guarantees that scene-wide consistency is fixed before production moves on, saving time later.
Optimizing Texel Density Over Distance.
Not all objects need maximum density at all times. Optimizations can drastically improve performance without hurting visuals.
Vista Meshes.
Since they are viewed from a distance, distant landscapes and skyline objects frequently have very low texel densities. Resources can now be concentrated on areas that are essential to gameplay thanks to these optimizations.
Manual Optimizations.
By reducing resolution on secondary or hidden surfaces and maintaining higher resolution for focal areas, artists can manually modify density. This frequently occurs in character models or weapons where certain elements are off-camera.
When to Break the Rules of Texel Density.
Sometimes, strict texel density isn’t practical.
Scaling in In-House Engines.
To make optimization easier, several internal engines mandate uniform texel density. However, when further detail is warranted, there are exceptions allowed for weaponry, UI elements, and cinematic assets. Strategically breaking the rules guarantees visual impact where it counts most.
Practical Examples of Texel Density in Action.
Think about a big object like a wall against a little one like a smartphone. The phone will appear incredibly detailed, but the wall will appear hazy if both are using the same 2K texture. Both appear balanced in the scene when the texel density is changed.
Character modeling is another example; because viewers instinctively focus on the face, it frequently requires a higher density than clothing. Game developers may allocate 2–3 times more texel density to facial areas compared to the body.
Source: 3DCoat Forums.
Tips and Tricks for Better Texel Density.
Testing is essential. To ensure consistency, always preview textures at the desired screen resolution. Scaling can be handled elegantly by using Level of Detail (LOD) systems and mipmaps. To increase surface detail without needlessly raising the texel density, use normal maps.
Making little changes, such as bringing your team's texel density standards into alignment, might save hours of work later on when resolving discrepancies.
Final Thoughts on Mastering Texel Density.
A key component of expert 3D work is textural density. Across games, movies, and visualizations, it guarantees visual coherence, maximizes performance, and enhances immersion. Artists may fully control the ratio of efficiency to detail by learning how to calculate, regulate, and modify it for various workflows.
Cloud rendering services like RebusFarm offer the ideal setting for large-scale experimentation if you want to see how texel density appears under actual production circumstances. Rendering complex scenes fast and consistently allows you to meet deadlines while concentrating on asset perfection.
Frequently Asked Questions.
How do I set texel density in Blender?
You can set texel density in Blender using the built-in UV scaling tools or, more efficiently, the Texel Density Checker addon.
How can I check texel density in Blender?
The Texel Density Checker addon overlays texel values directly on your model, making it easy to maintain consistency.
Which texel density addon is best for Blender?
The most popular choice is Texel Density Checker, widely used by Blender artists for reliable results.
How do I set texel density in Maya?
Maya includes a Texel Density option in the UV Toolkit, allowing you to unify texture scale across multiple assets.
What is a good texel density for games?
It depends on the project, but common standards include around 512 px/m for background props and 1024 px/m for hero assets. Always adapt values to the target platform and performance needs.
How do you manage texel density in 3ds Max?
3ds Max doesn't have a built-in texel density tool, but artists often rely on scripts like TexTools or other third-party plugins to calculate and adjust texel density effectively.
Thank you for taking the time to read our article. We hope it gave you a good understanding of what Texel Density is and how to use it on several platforms according to your needs.
Kind regards & Keep rendering! 🧡

About the author
Vasilis Koutlis, the founder of VWArtclub, was born in Athens in 1979. After studying furniture design and decoration, he started dedicating himself to 3D art in 2002. In 2012, the idea of VWArtclub was born: an active 3D community that has grown over the last 12 years into one of the largest online 3D communities worldwide, with over 160 thousand members. He acquired partners worldwide, and various collaborators trusted him with their ideas as he rewarded them with his consistent state-of-the-art services. Not a moment goes by without him thinking of a beautiful image; thus, he is never concerned with time but only with the design's quality.
![]()
![]()
![]()
![]()
![]()
